Meerkat (Parts & Repairs)
Several components in your Meerkat can be upgraded or replaced as necessary. Power the machine off and unplug all peripherals before working with any internal components. Then, follow these step-by-step guides for instructions:
- Removing the bottom panel
- Replacing the M.2 drive
- Replacing the RAM
- Adding/removing a 2.5“ storage drive
- Resetting CMOS
- Removing the motherboard
- Removing the fan
- Replacing thermal paste
- Mounting with VESA mount
Removing the bottom panel:
The bottom panel can be removed to access the internal components.
Tools required: Cross-head (Phillips) screwdriver
Time estimate: 3 minutes
Difficulty: Easy ●
Steps to remove the bottom panel:
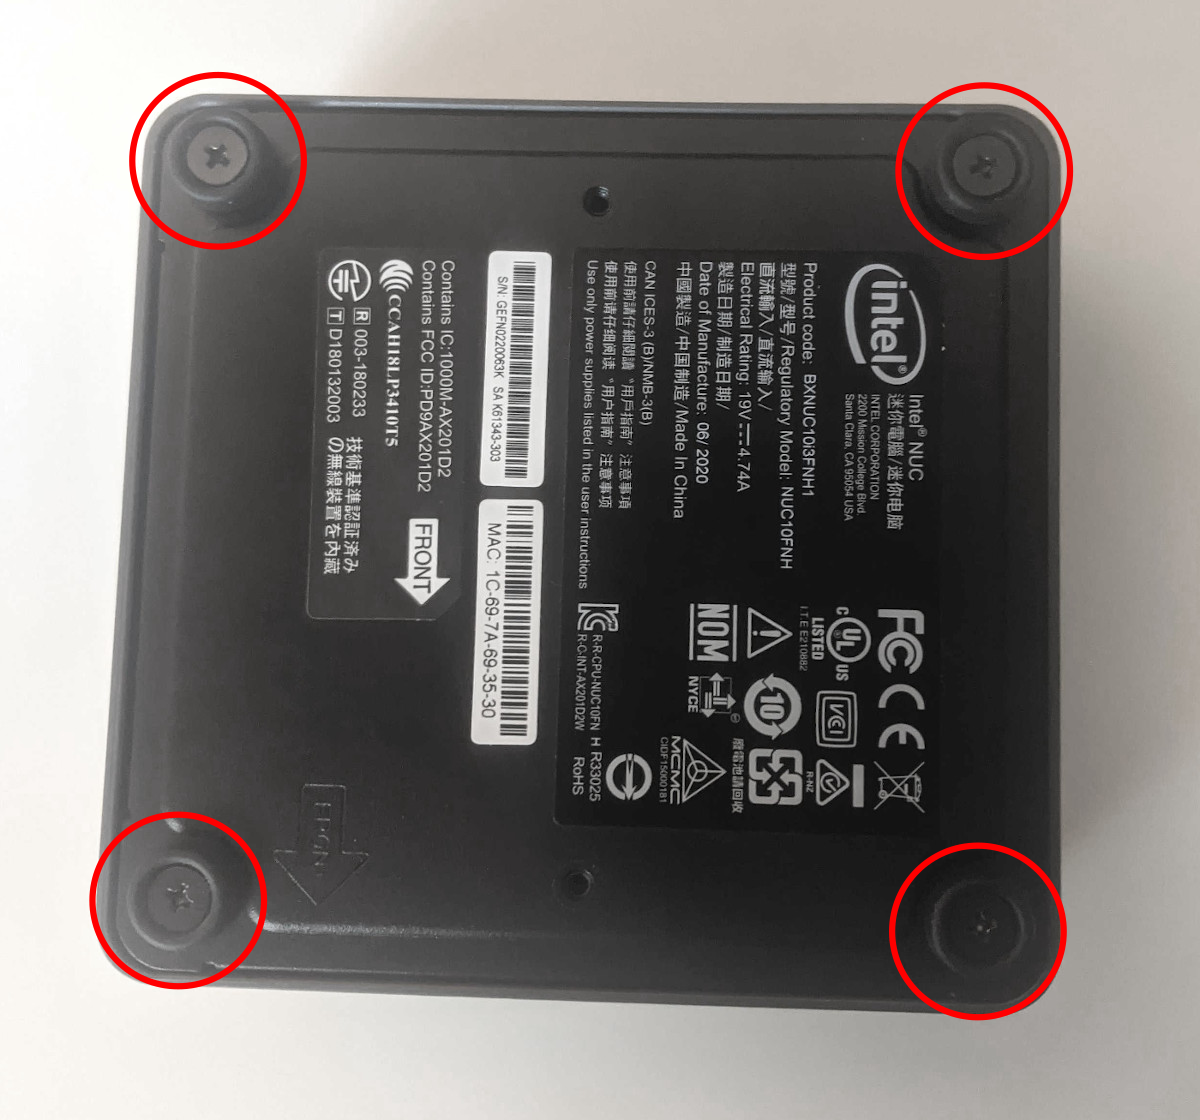
- Place the machine lid-side down.
- Use a soft surface (such as a towel) to avoid scratches.
- Completely loosen the four screws in the corners.
-
The screws are held captive in the bottom panel, so they will not come completely out of the machine, but once they are fully loose, you will be able to grab the screws and gently lift the bottom panel out of the machine.
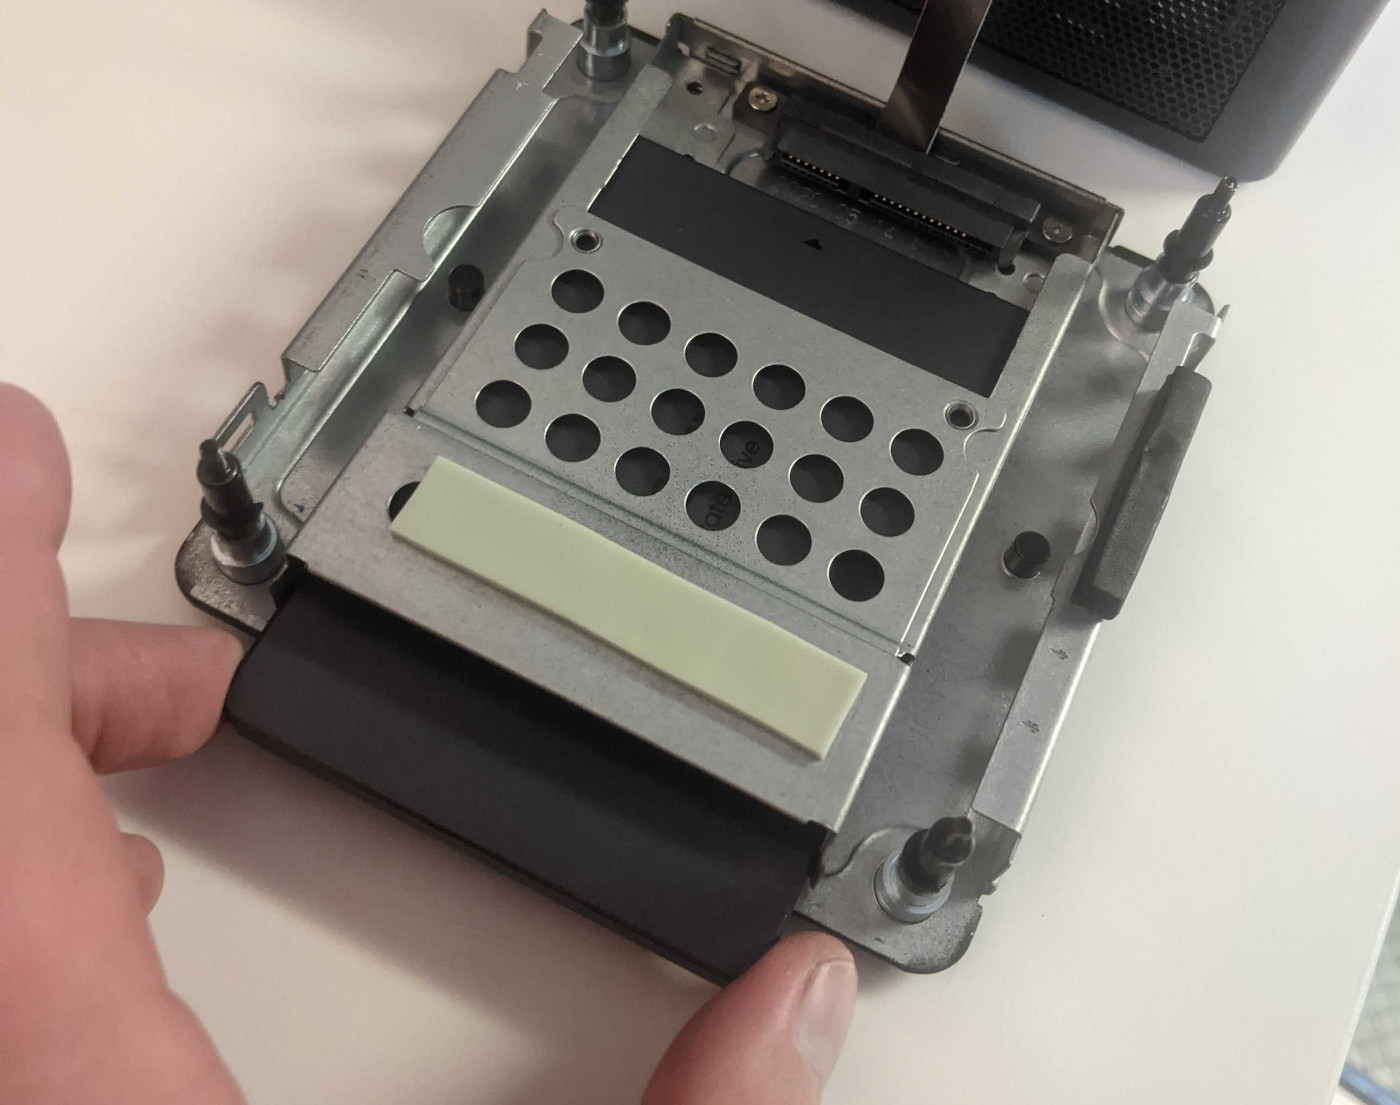
If your Meerkat is the Tall variation, use caution when lifting the bottom panel off, as there is a thin cable that attaches to the drive bay in the bottom panel. The cable should be long enough that you can set the bottom panel next to the machine without having to disconnect it at the motherboard, as shown below:
If your Meerkat is the Short variation, you will have no such cable, allowing you to completely remove the bottom panel after the four screws are completely loosened.
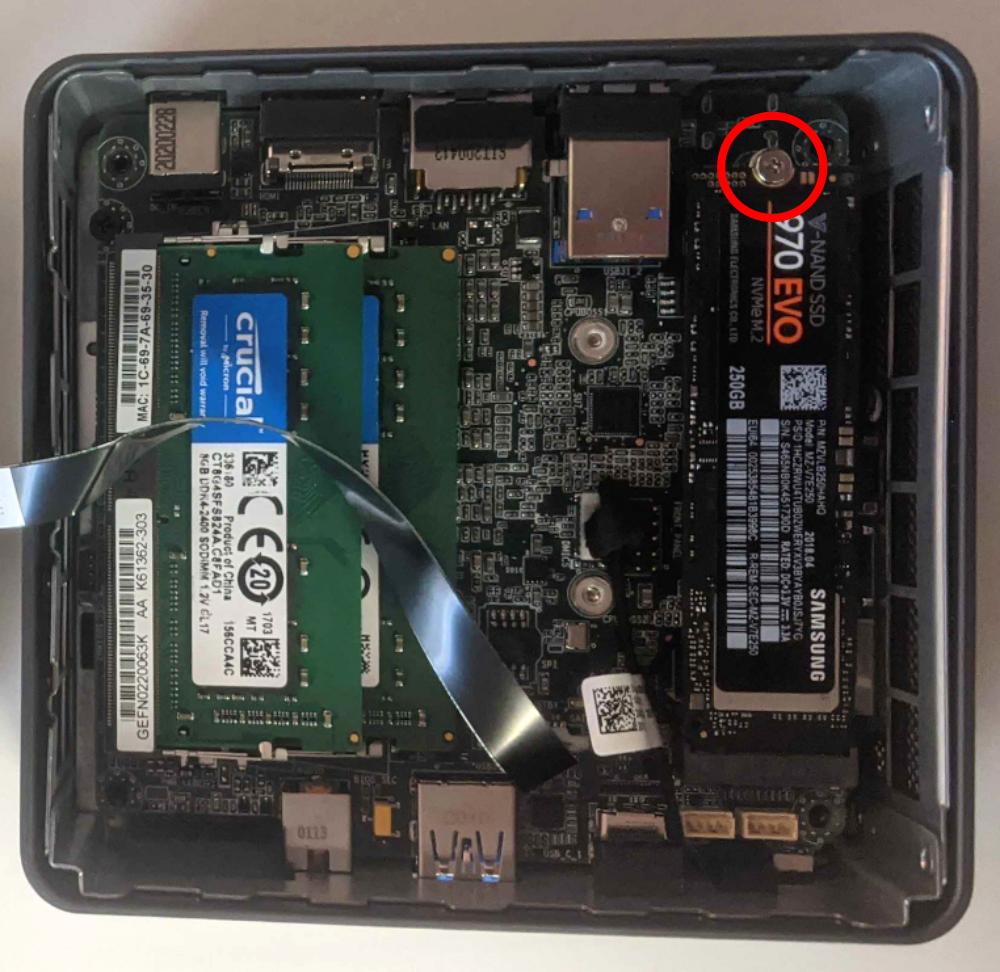
Replacing the M.2 drive:
Your Meerkat has one M.2 slot, which supports either PCIe NVMe Gen 3 x4 or SATA III. The following M.2 sizes are supported: 2280 and 2242.
Tools required: Cross-head (Phillips) screwdriver
Time estimate: 10 minutes
Difficulty: Easy ●
Steps to replace the M.2 drive:
- Follow the steps above to remove the bottom panel.
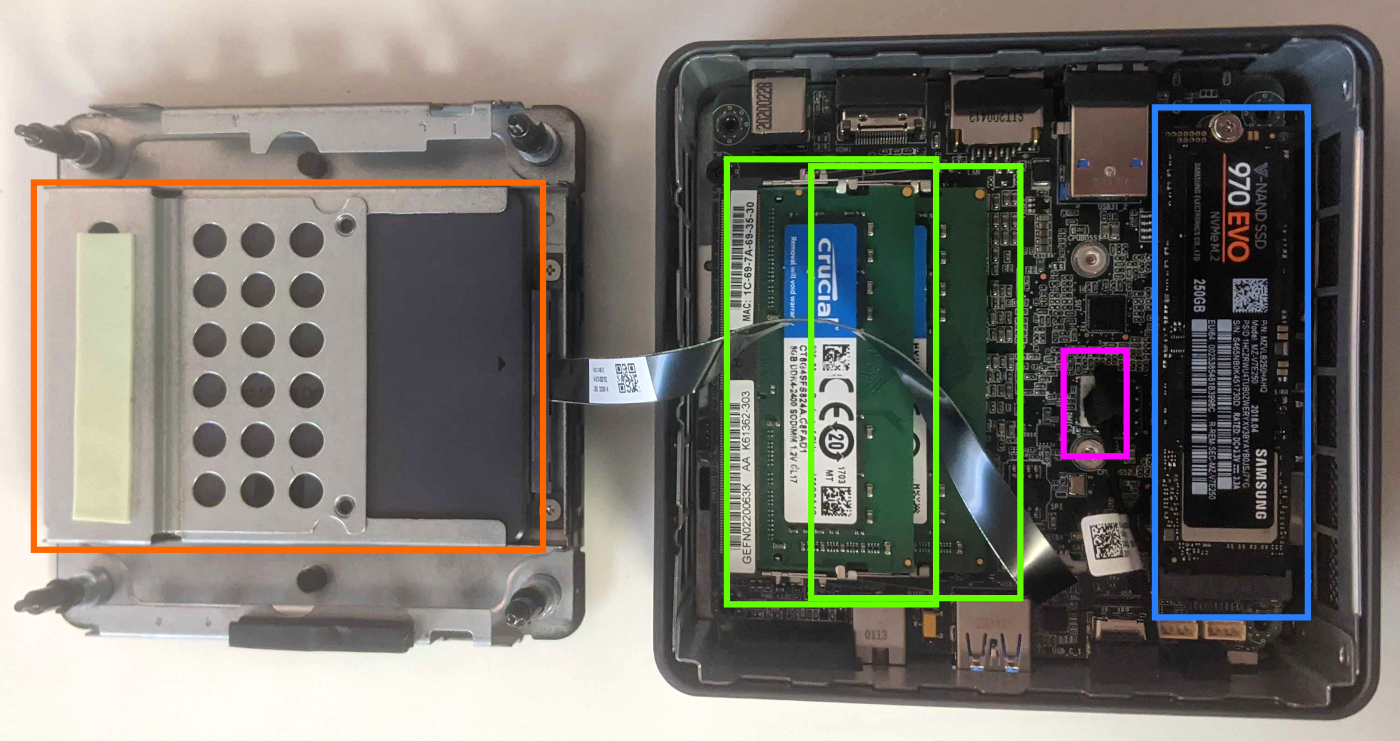
- Unscrew the retainer screw on the end of the SSD opposite the M.2 slot.
- Remove the existing M.2 drive by pulling it out of the slot.
- Insert the new M.2 drive into the slot and hold it in place.
- Replace the retainer screw.
- Replace the bottom panel.
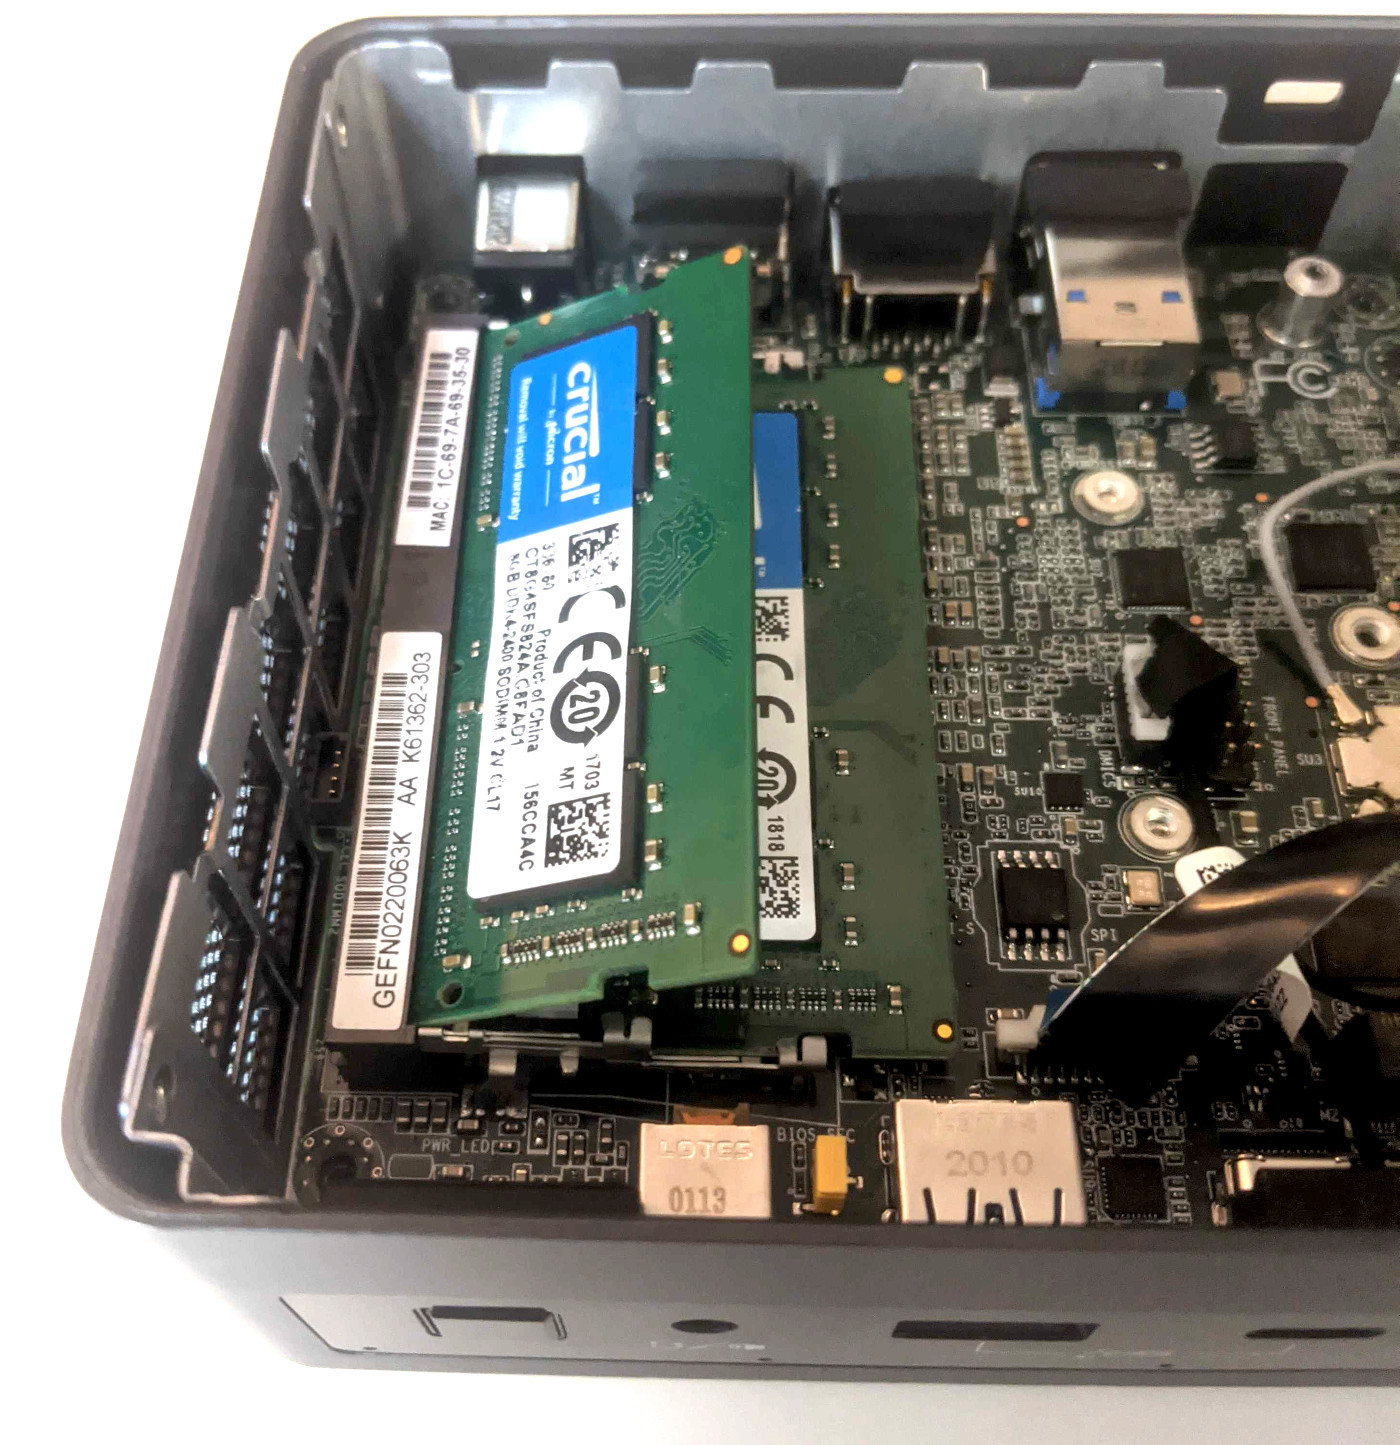
Replacing the RAM:
Your Meerkat supports up to 64GB (2x32GB) of RAM. The RAM sticks are DDR4 SODIMMs running at a speed of 2666MHz. If you’ve purchased new RAM, need to replace your RAM, or are re-seating your RAM, follow these steps.
Tools required: Cross-head (Phillips) screwdriver
Time estimate: 10 minutes
Difficulty: Easy ●
Steps to replace the RAM:
- Follow the steps above to remove the bottom panel.
- Since the RAM slots are stacked on your Meerkat, if you have two RAM sticks installed, the top one must be removed before you can access the one below it. To remove a RAM stick, both RAM latches need to be simultaneously pushed out and away from the edges of the RAM stick.
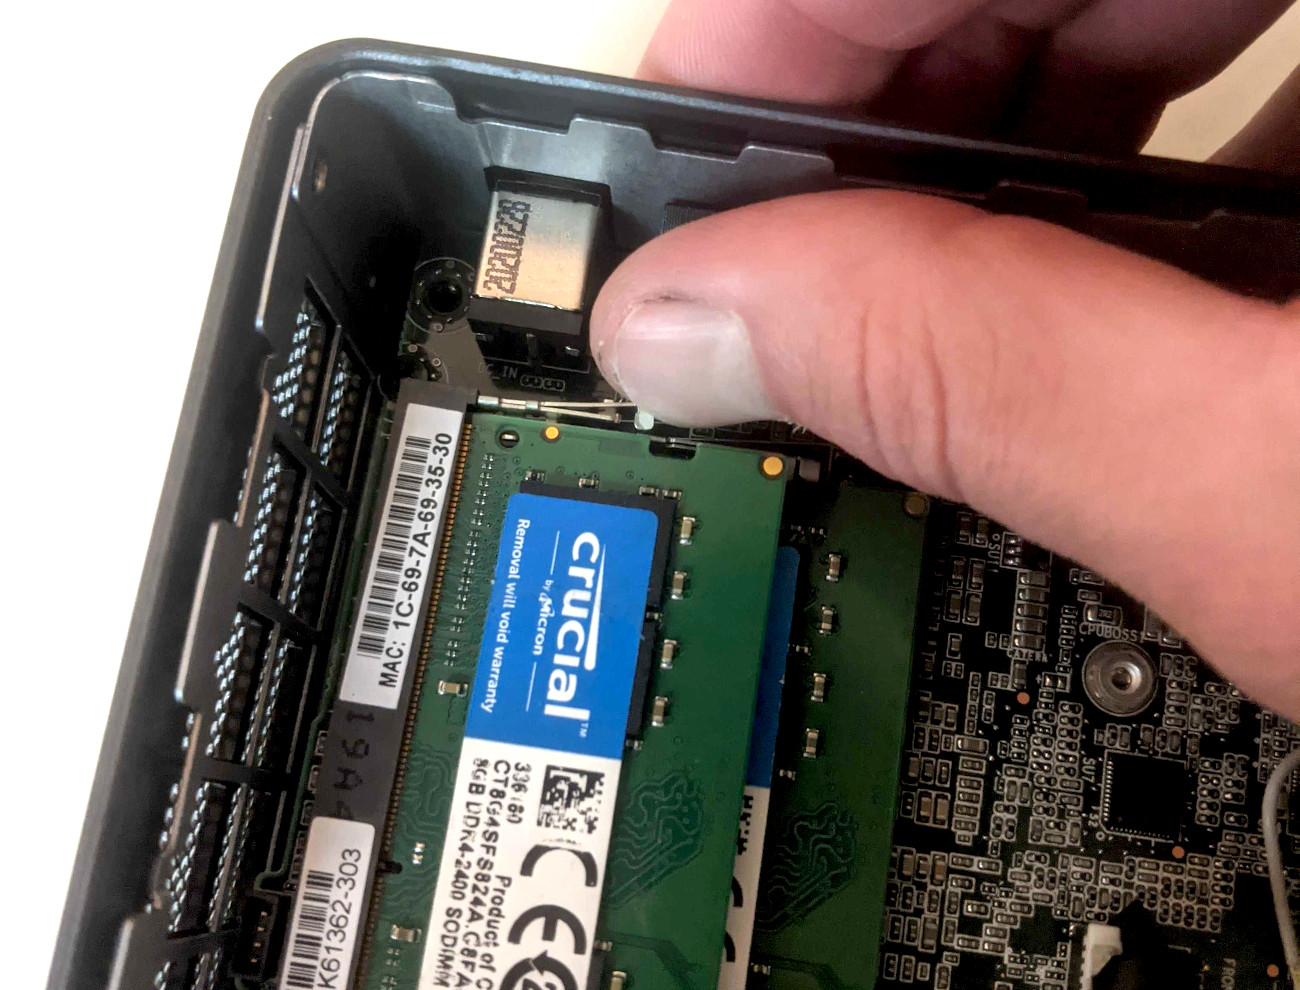
- Once both latches are released, the RAM stick will pop up, pushed by the spring tension from the RAM slot. This means the RAM stick can be pulled backwards out of the slot.
-
To install a RAM stick, slide the stick into the slot at roughly the same angle it was sitting after the latches were released, then push the back edge of the RAM stick downwards so the latches on the sides re-engage.
-
Replace the bottom panel.
Adding/removing a 2.5“ storage drive:
If your Meerkat is the tall variety, it has a 2.5“ drive bay built into the bottom panel.
Tools required: Cross-head (Phillips) screwdriver
Time estimate: 10 minutes
Difficulty: Easy ●
Steps to add/remove 2.5“ storage drives:
- Follow the steps above to remove the bottom panel.
- Take note of the orientation of the connector on the drive you are installing.
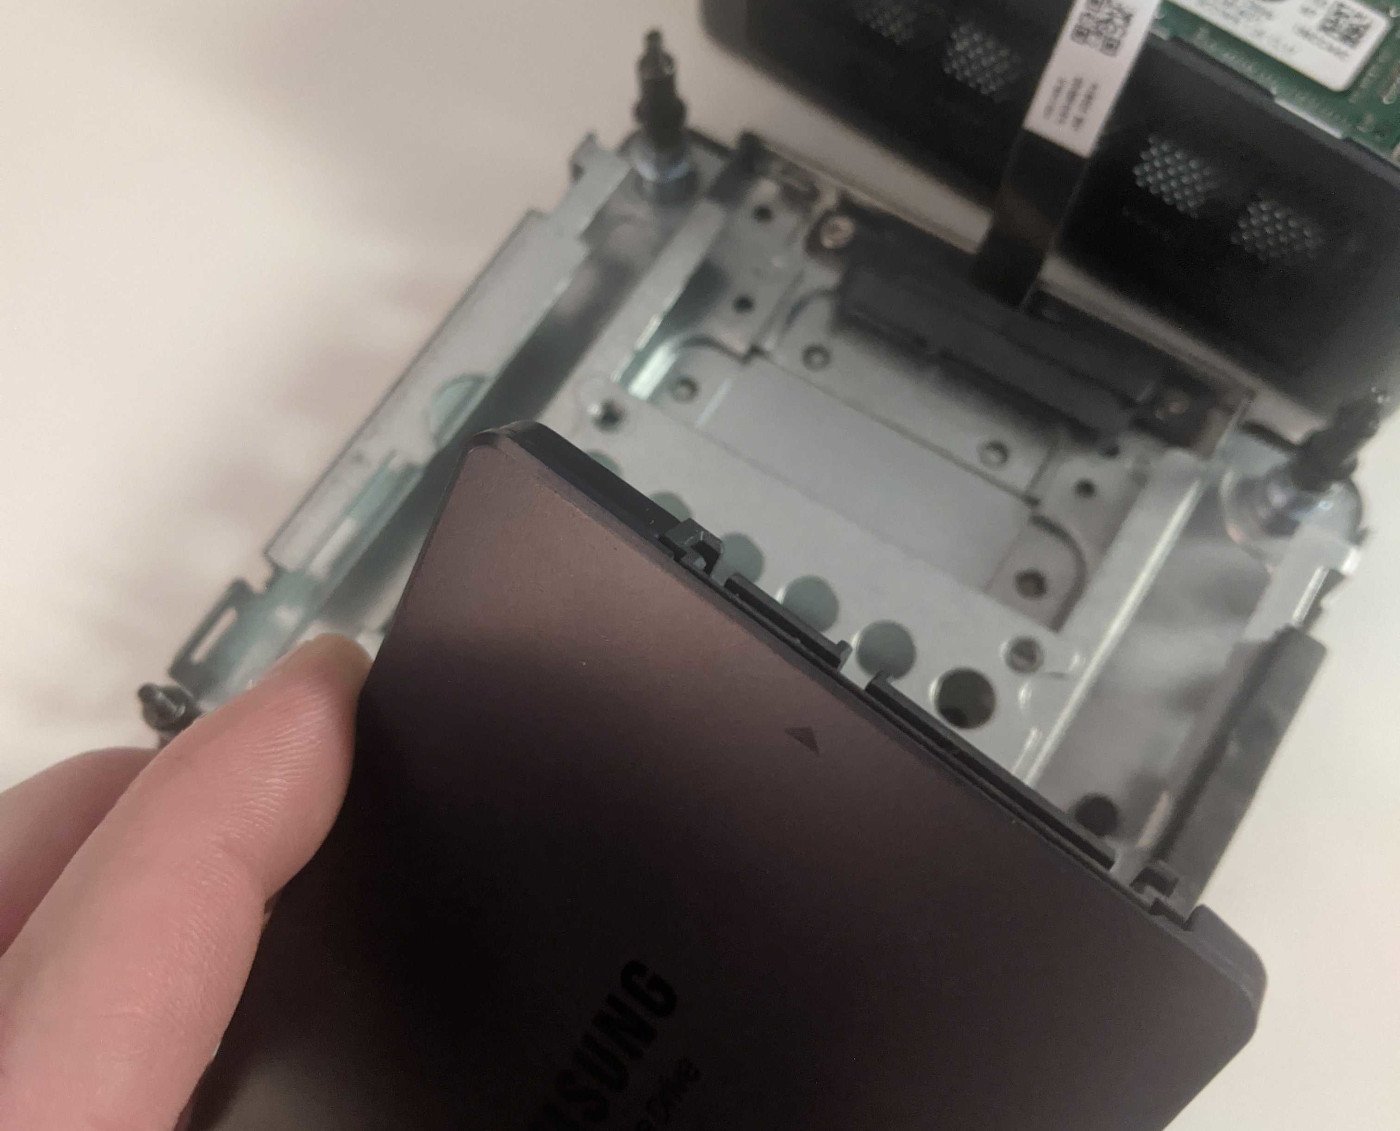
- Slide the drive into the slot on the bottom panel until it plugs all the way into its connector.
- Replace the bottom panel.
Resetting CMOS:
Sometimes resetting CMOS can help if your Meerkat is not booting. A CMOS reset will restore BIOS settings to their factory defaults, so you may have to reconfigure your BIOS afterwards.
Warning (ingestion hazard): Keep batteries out of reach of children. Death or serious injury can occur if ingested. If a battery is suspected to be swallowed or inserted inside any part of the body, seek immediate medical attention. In the US, you can also call the National Battery Ingestion Hotline for guidance: 1 (800) 498-8666
Tools required: Cross-head (Phillips) screwdriver and (optionally) tweezers
Time estimate: 15 minutes
Difficulty: Medium ●
Steps to reset CMOS:
- Follow the steps above to remove the bottom panel and remove the M.2 drive.
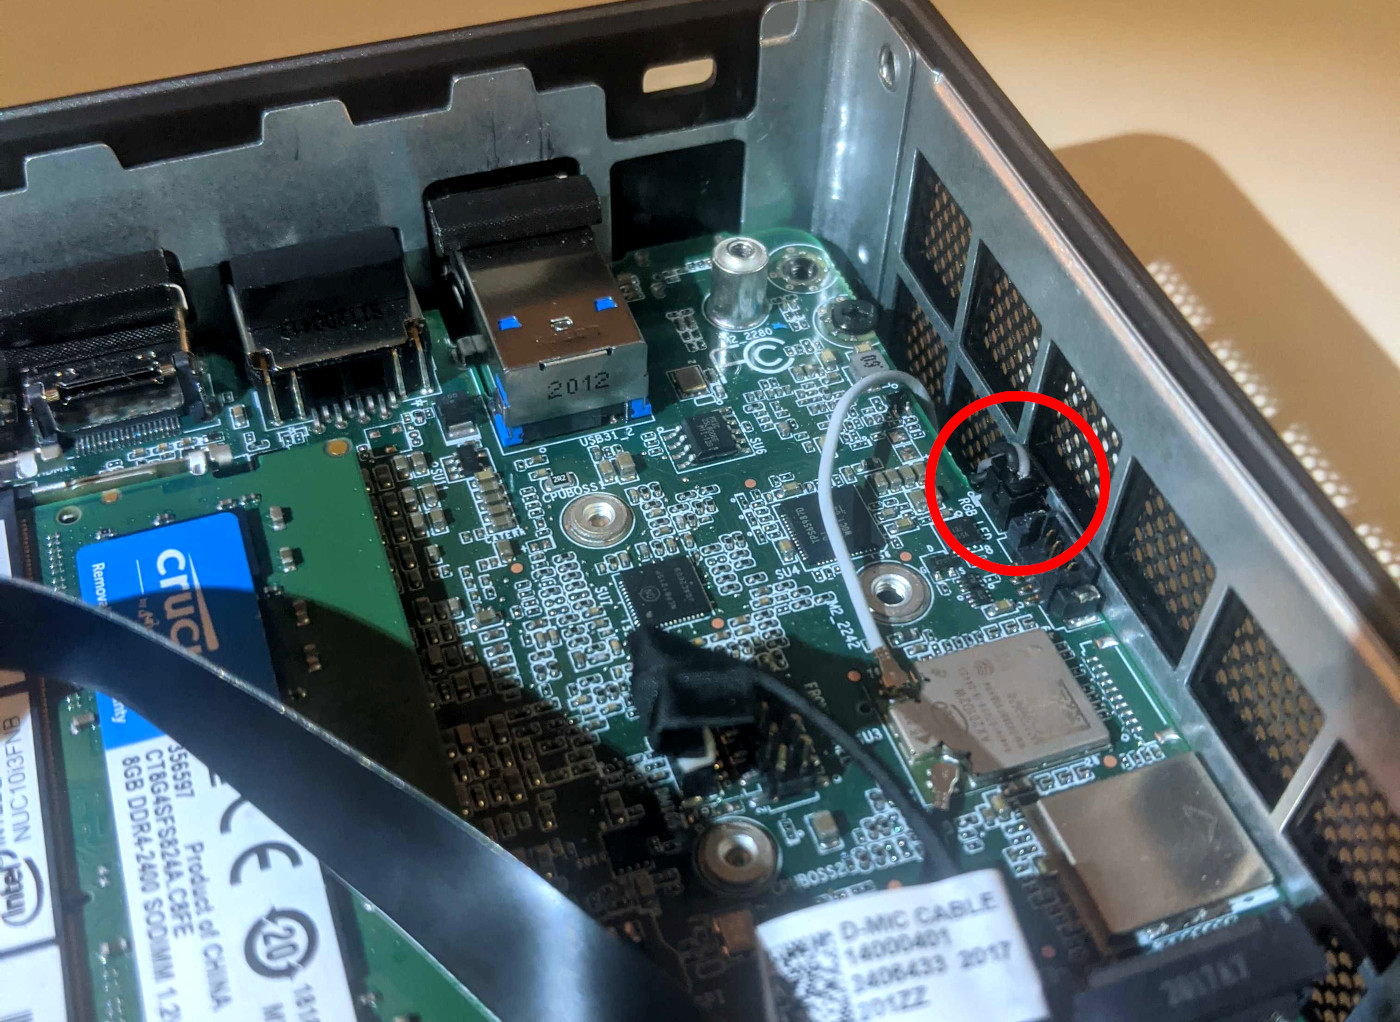
- Disconnect the CMOS battery connector, shown circled in red below. Tweezers may make this easier, but try to pull it by the plug itself rather than by the wires.
- Leave the connector unplugged for several minutes. CMOS values don’t always clear instantly, and sometimes it takes a couple minutes for them to reset.
- Reconnect the CMOS battery.
- Replace the M.2 drive and the bottom panel.
- When you boot your Meerkat after resetting CMOS, it may take a minute or two longer than usual to boot the first time. It has to re-initialize some of the CMOS values that were reset.
Removing the Motherboard:
Removing the motherboard is necessary for removing the cooling fan, cleaning the CPU heatsink, and replacing the CPU thermal paste.
Tools required: Cross-head (Phillips) screwdriver
Time estimate: 20 minutes
Difficulty: High ●
Steps to remove the motherboard:
- Follow the steps above to remove the bottom panel, remove the M.2 drive, and remove the RAM.
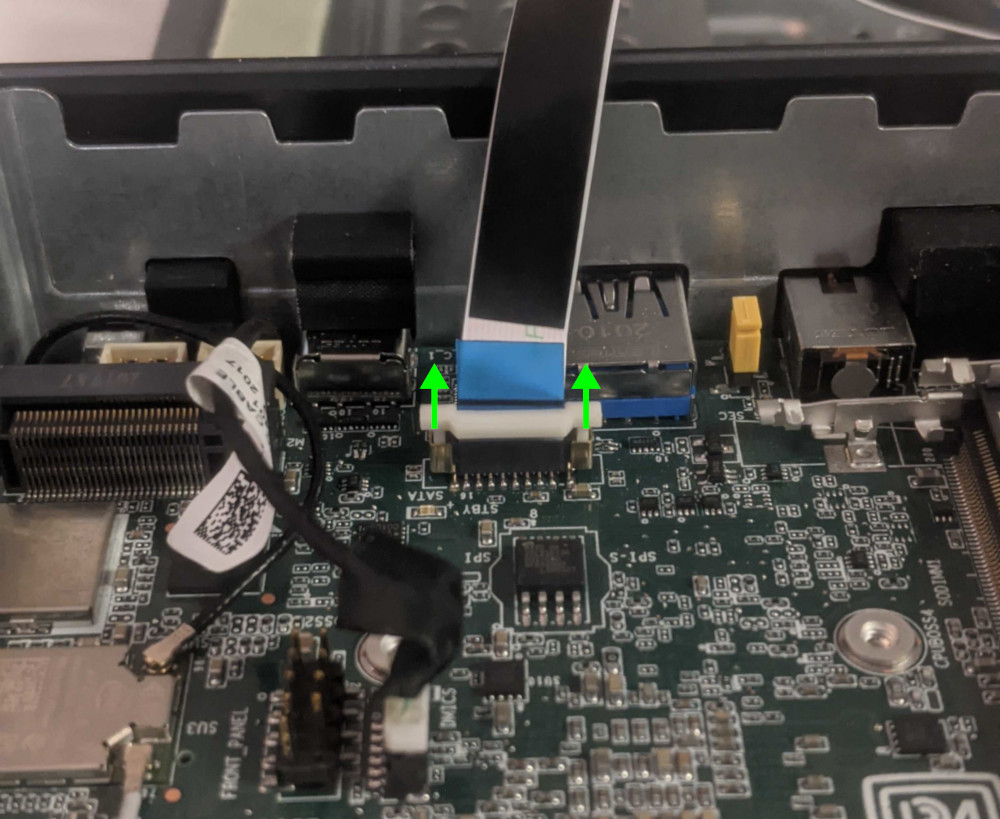
- If your Meerkat is the tall variety, disconnect the ribbon cable that leads to the 2.5“ drive bay built into the bottom panel. The small white latch comes up to unlock the cable, then the cable can be gently pulled free from its socket.
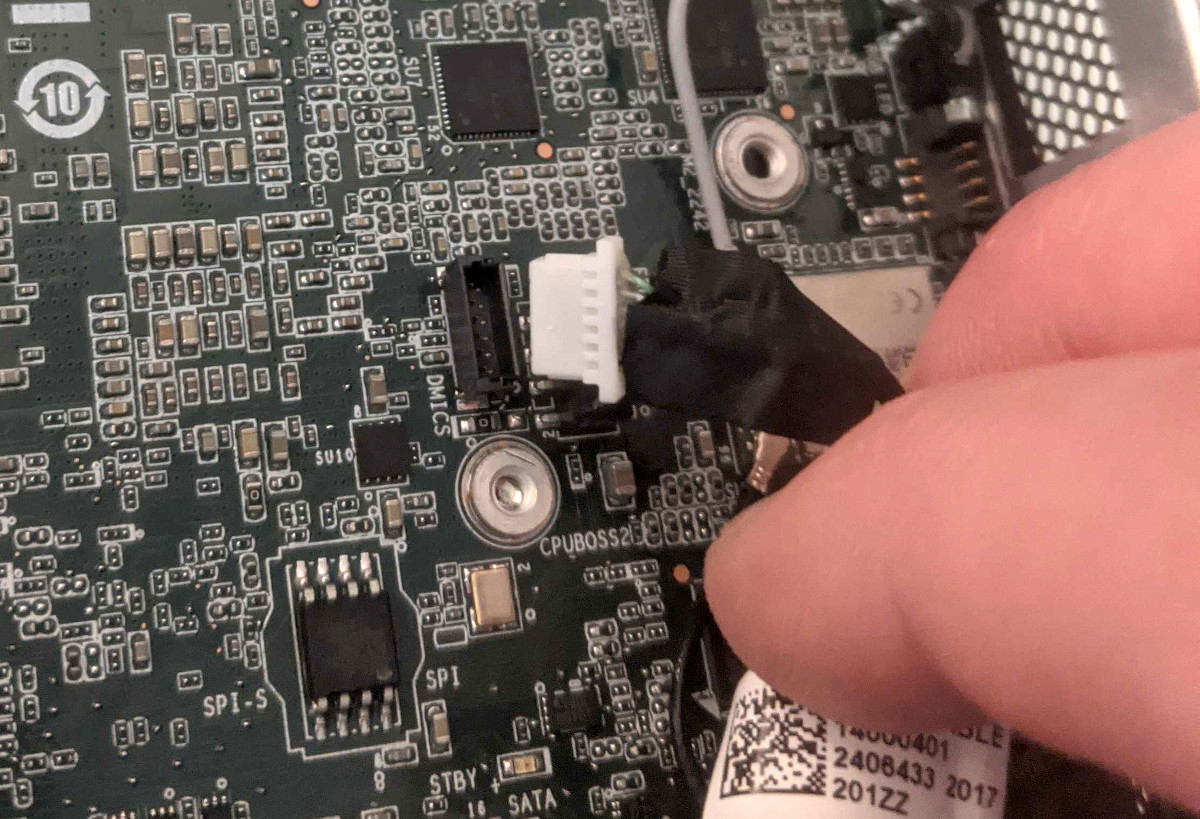
- Disconnect the front microphone cable.
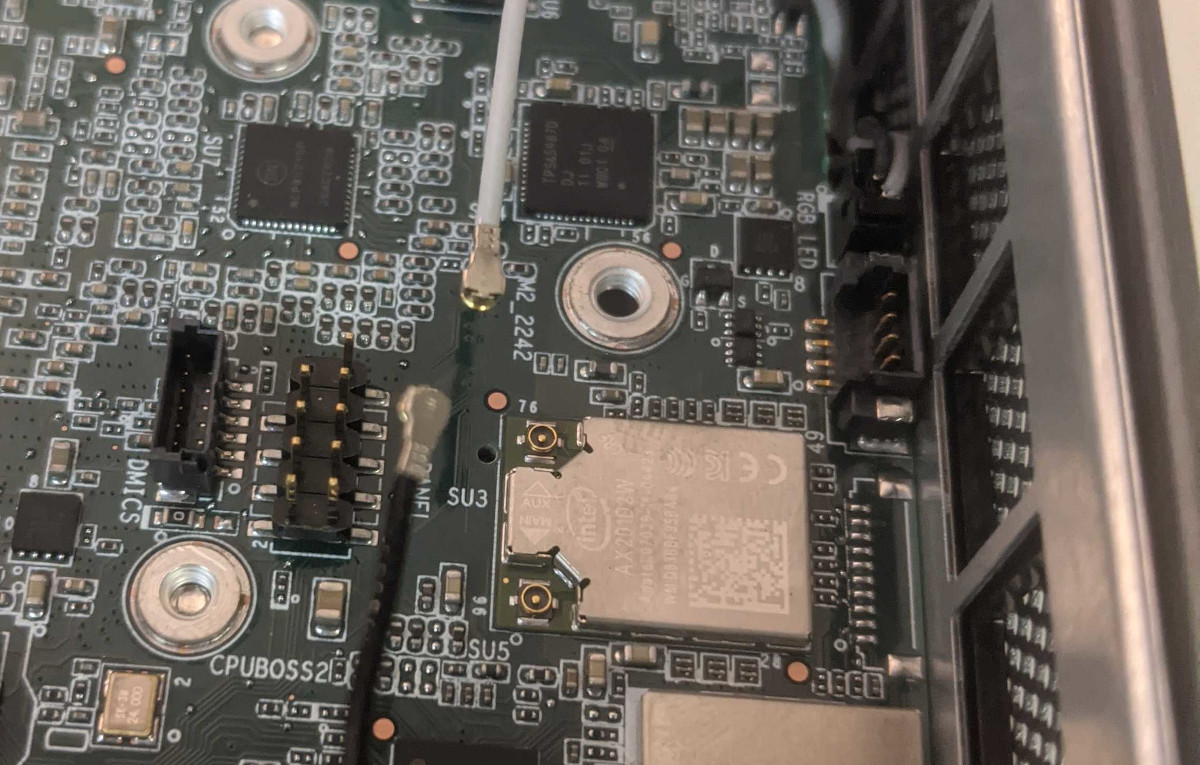
- Disconnect the two wireless antenna cables.
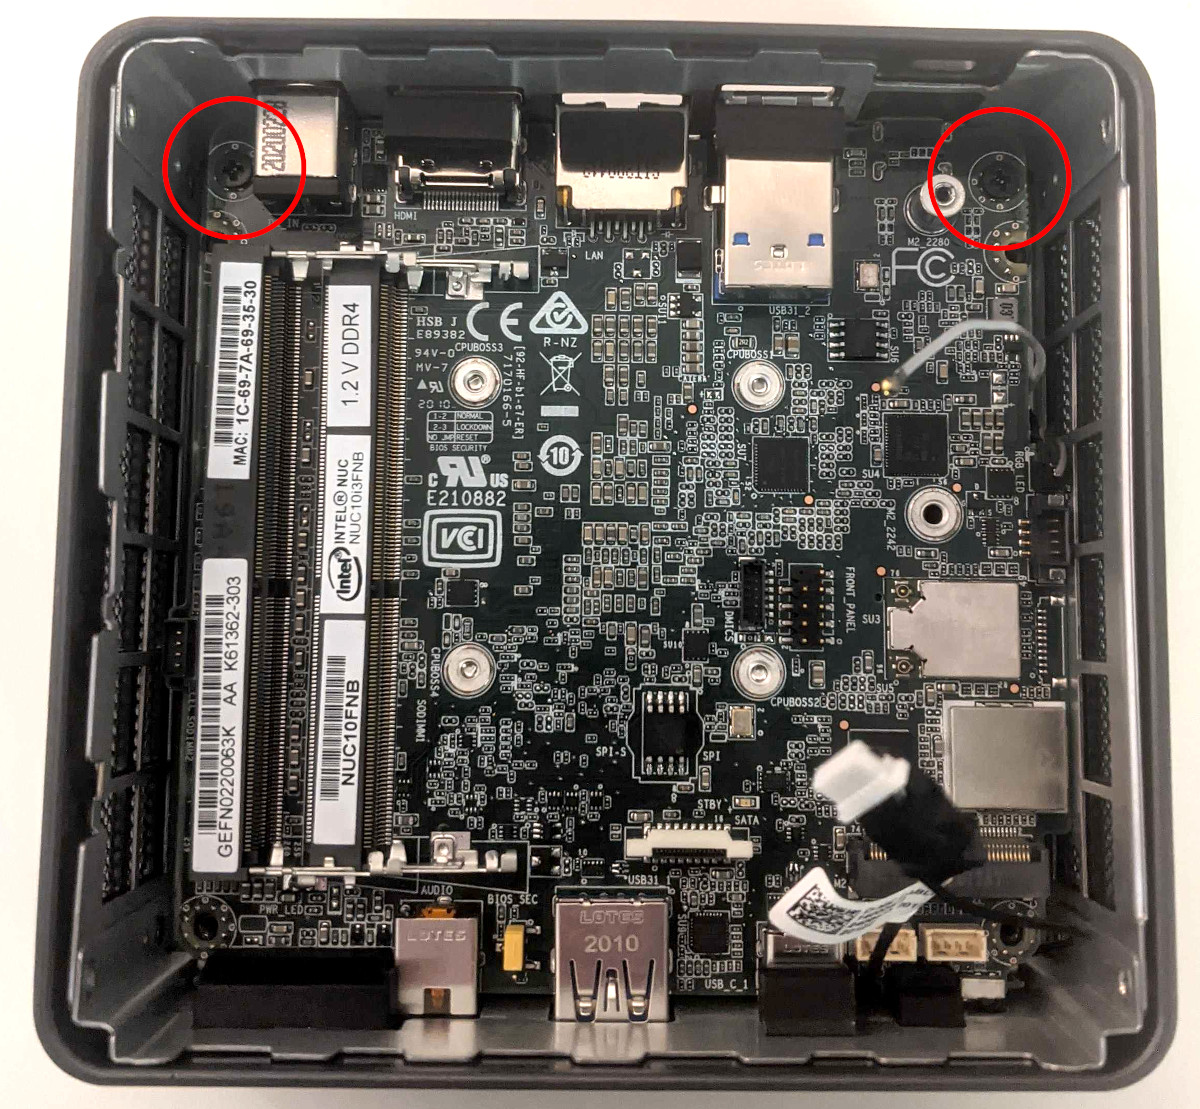
- Remove the two motherboard mounting screws.
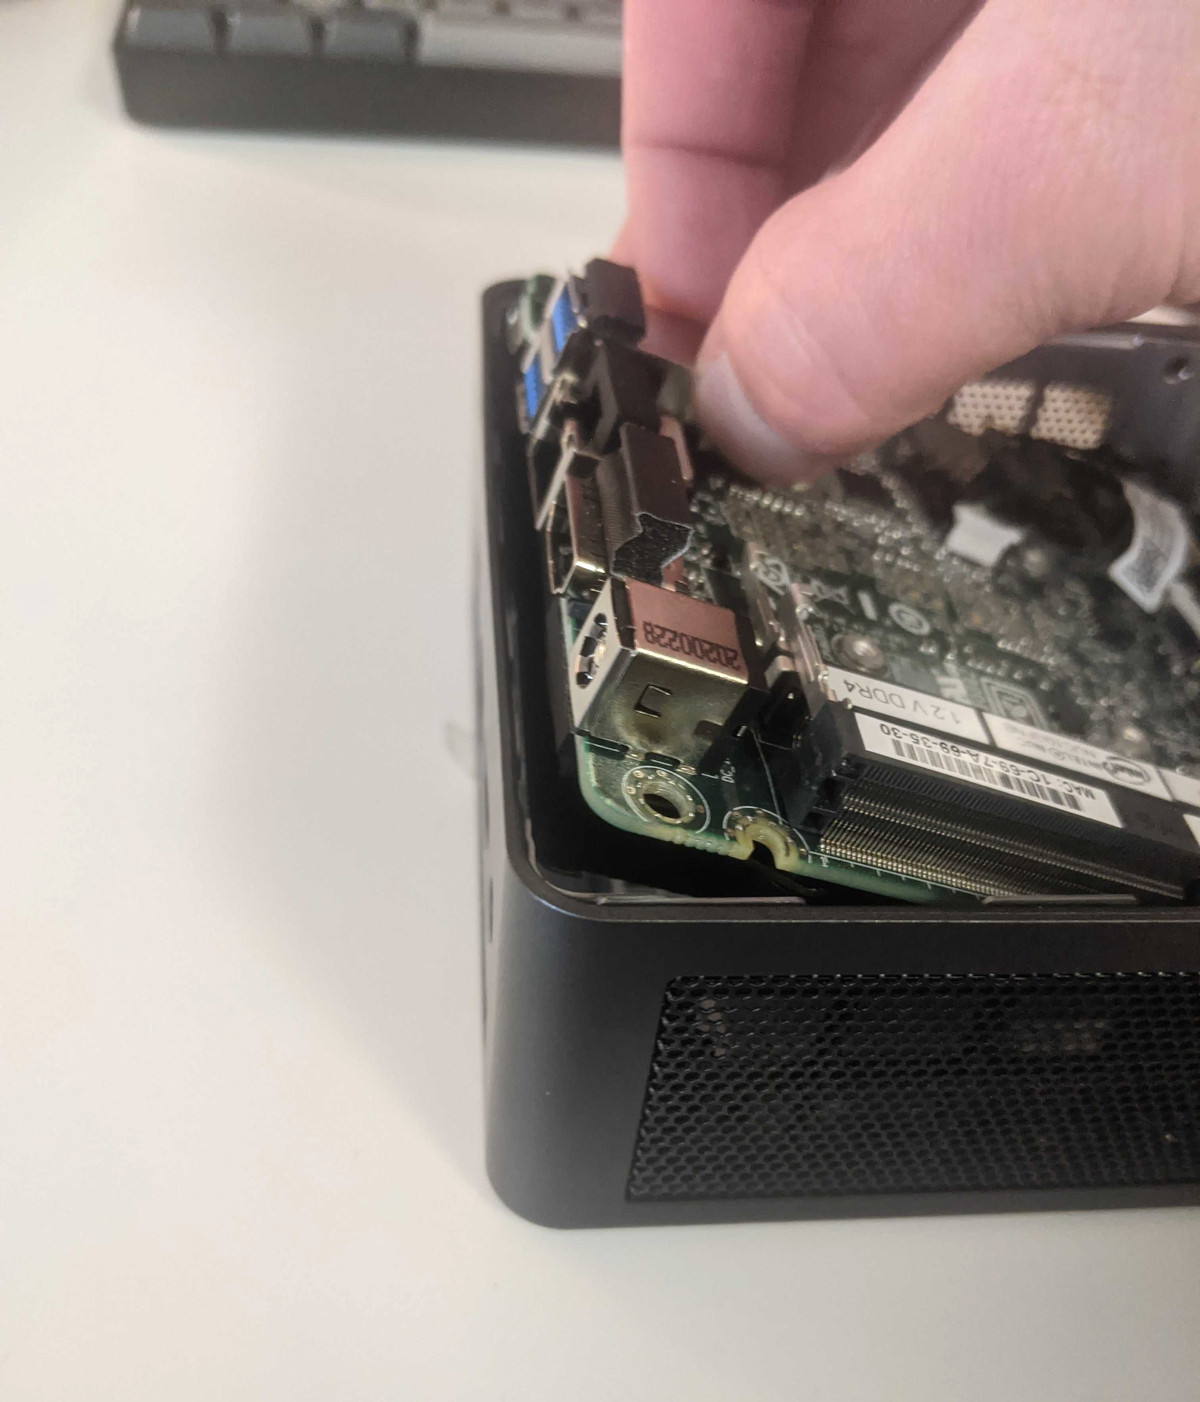
- Carefully lift the motherboard out of the case. It is easiest to lift from the back side, grabbing the USB type A ports as shown below. The back wall of the case can be pulled slightly outwards, away from the motherboard, to help the ports come out of their cutouts in the case.
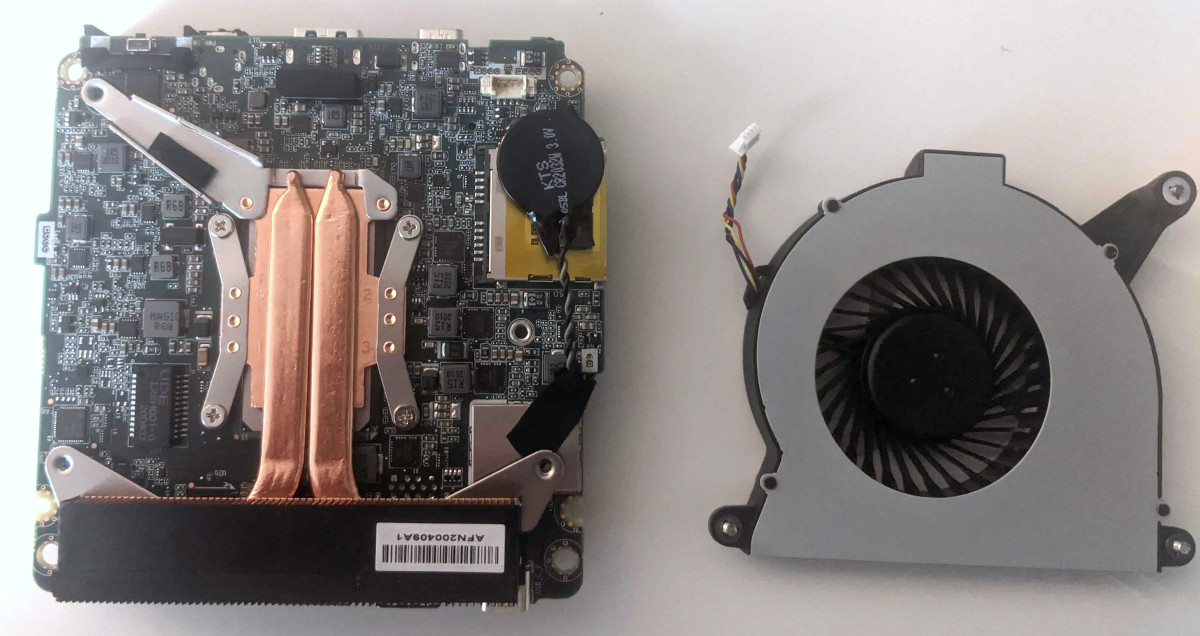
Removing the Fan:
The cooling fan can be removed to clean dust out of the cooling system or to access the CPU heatsink to replace the CPU thermal paste.
Tools required: Cross-head (Phillips) screwdriver
Time estimate: 25 minutes
Difficulty: High ●
Steps to remove the fan:
-
Follow the steps above to remove the motherboard.
-
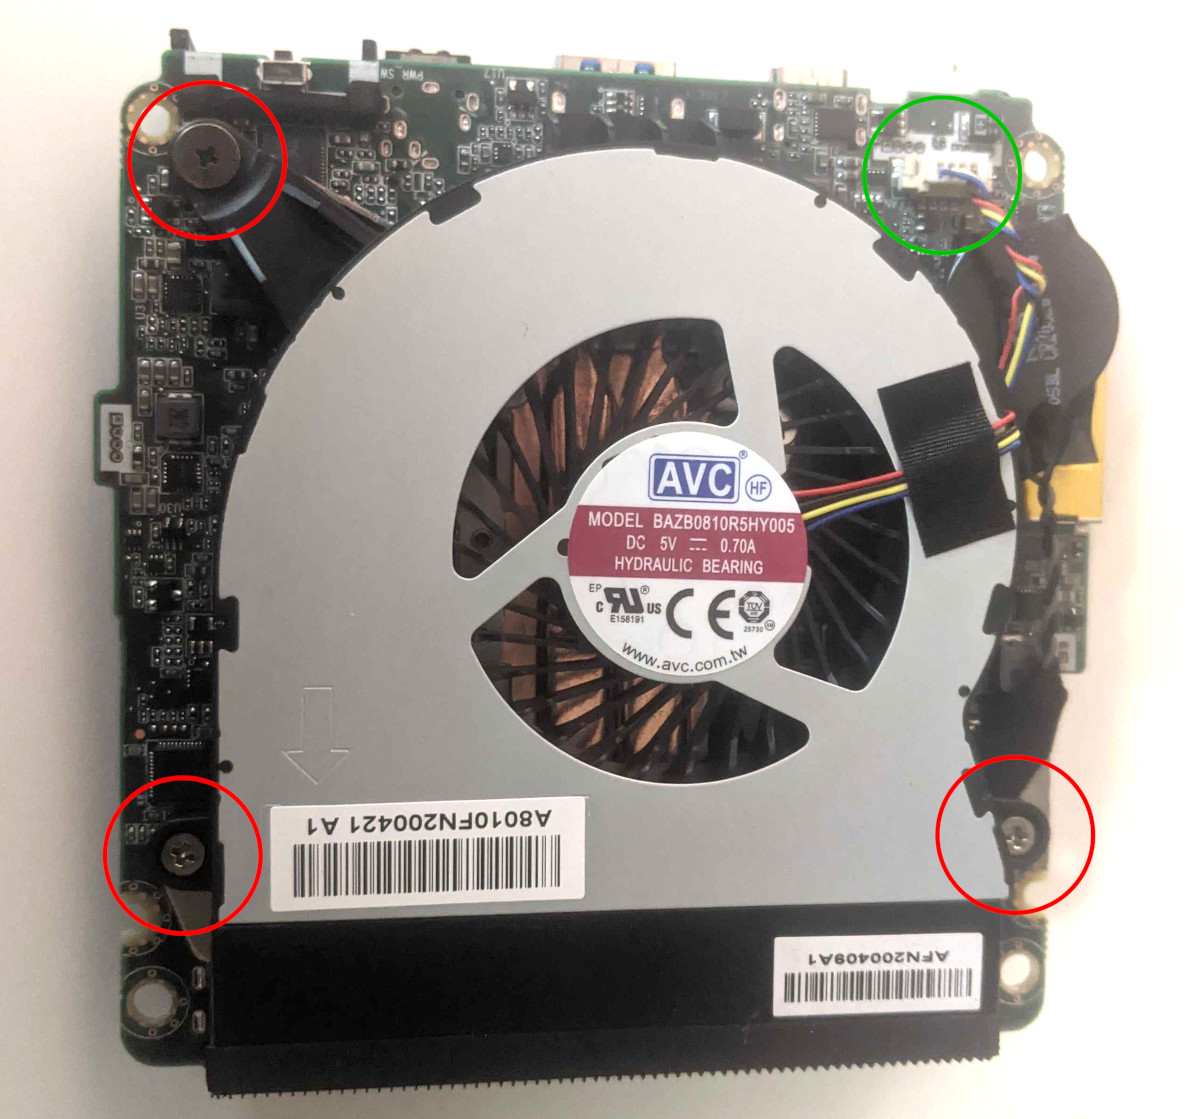
Completely loosen the three mounting screws (highlighted in red) and disconnect the fan cable (highlighted in green). The screws are captive, so they will not come out of the fan assembly when they are completely loosened.
- The fan can now be lifted away from the motherboard.
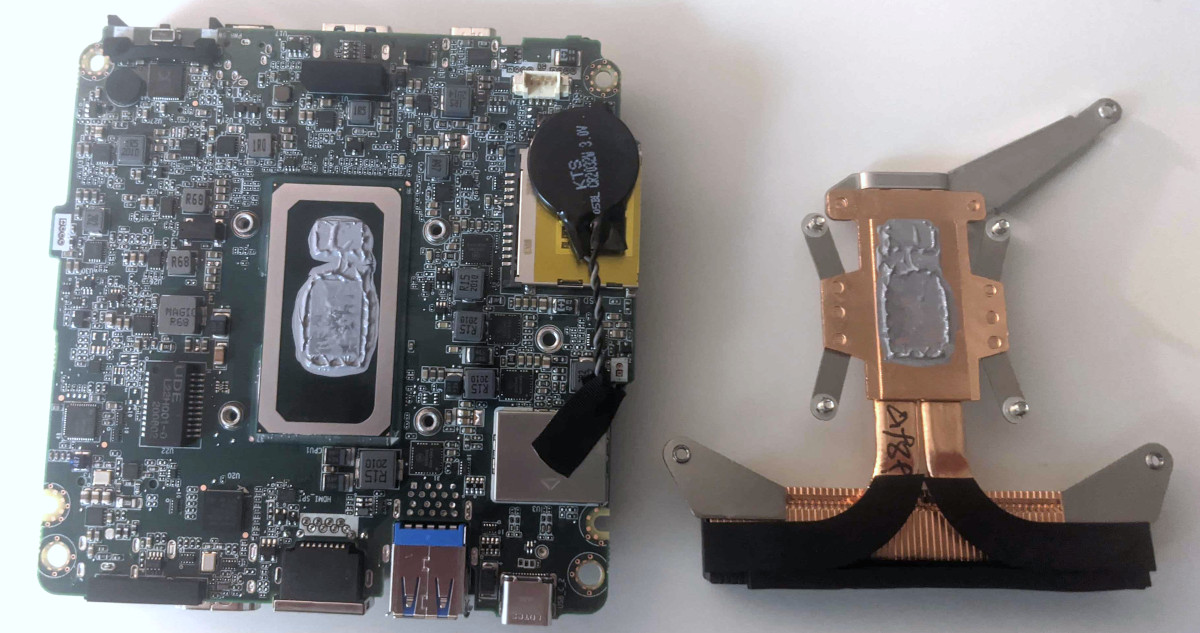
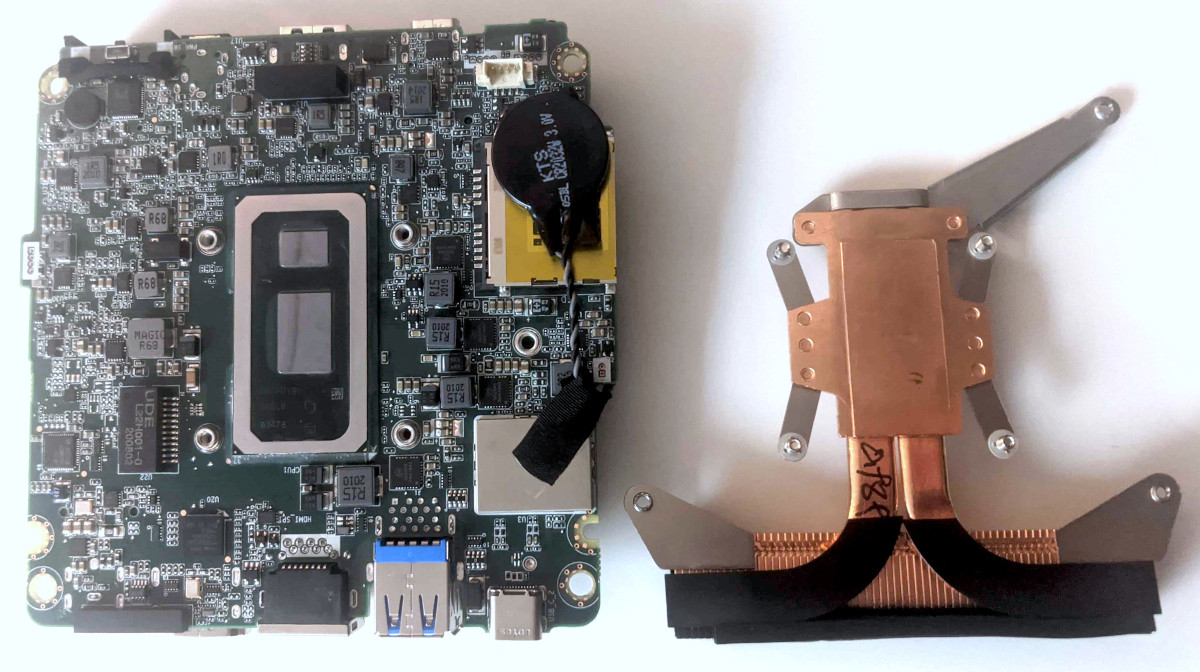
Replacing Thermal Paste:
The CPU cooler dissipates heat from the CPU to the heatsink, where the CPU fan expels it from the system. Depending on your climate and the age of the machine, replacing the thermal paste between the CPU and the heatsink may help the system run cooler.
Tools required: Cross-head (Phillips) screwdriver
Time estimate: 35 minutes
Difficulty: High ●
Steps to replace the thermal paste:
-
Follow the steps above to remove the fan.
-
Completely loosen the four screws that hold the heatsink onto the motherboard (highlighted in red). The screws are captive, so they will not come out of the heatsink brackets when completely loosened.

- Gently lift the heatsink off of the motherboard.
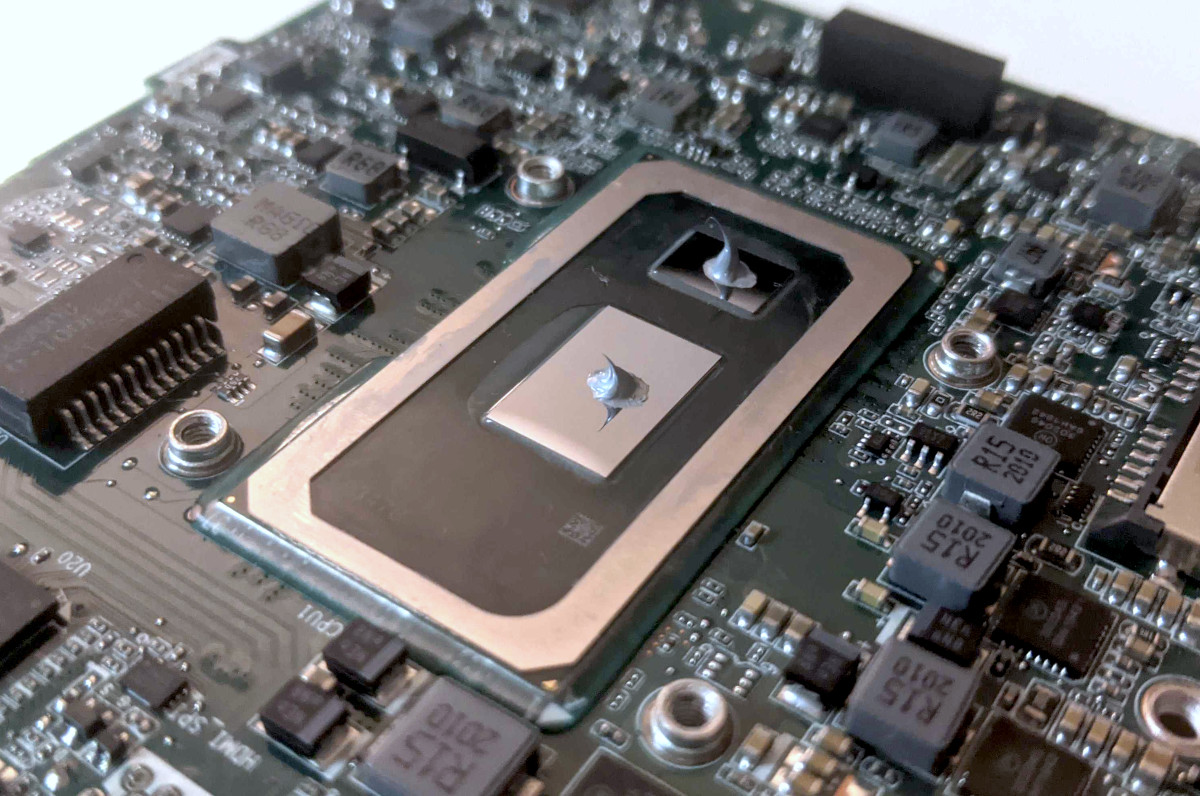
- Using a paper towel, clean the old thermal paste off of the heatsink and CPU. You may also use a small amount of rubbing alcohol if the old paste is dried or difficult to remove.
- Apply new thermal paste to both silicon dies on the CPU. Be careful not to use too much, as just a little goes a long way.
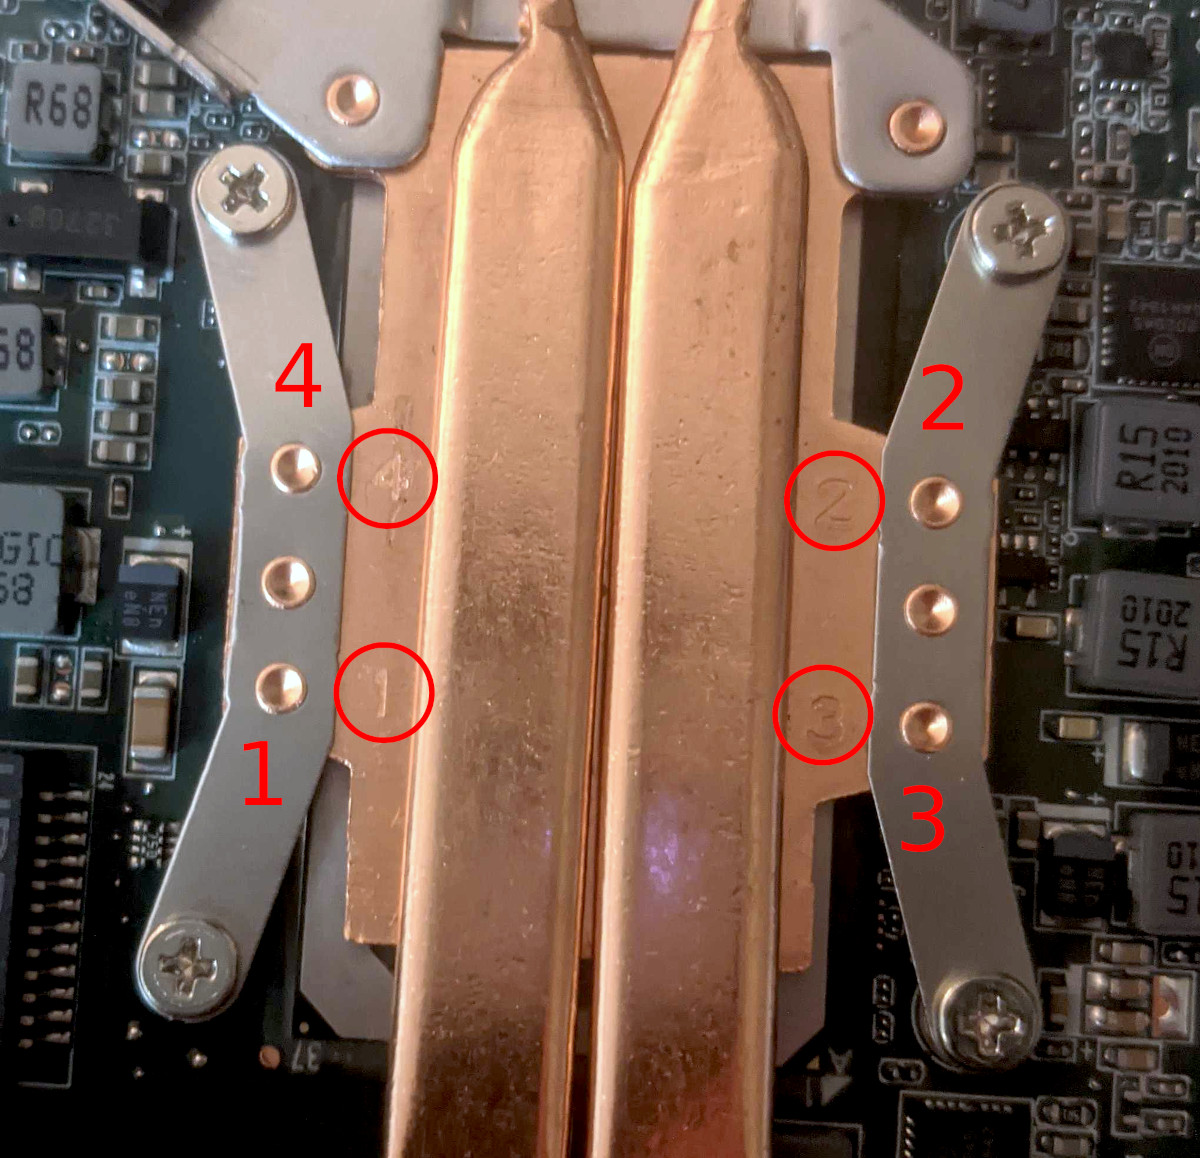
- Reinstall the heatsink and tighten the four screws in the order indicated by the numbers stamped on the heatsink (highlighted in red).
- Reinstall the cooling fan (remember to plug it in!), motherboard, RAM, drive, and bottom panel.
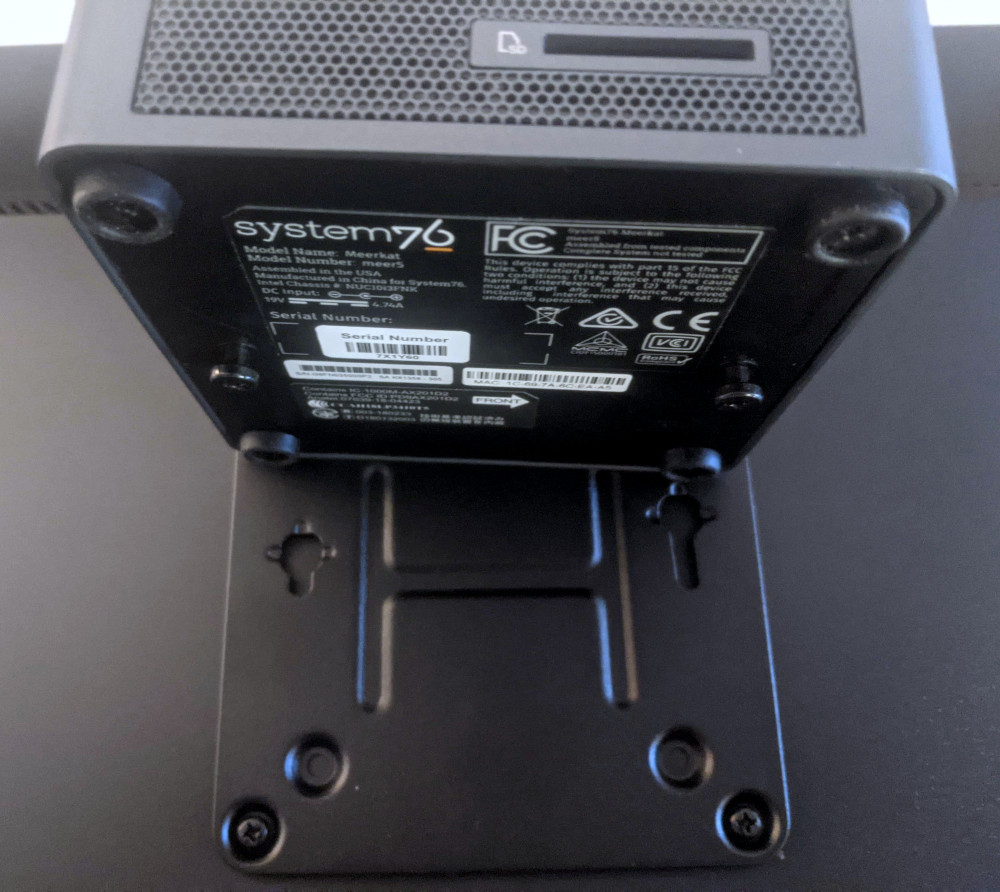
Mounting with VESA Mount:
Your Meerkat comes with a VESA mount adapter, which allows it to be mounted on the back of a monitor. Because it mounts to the monitor’s VESA mount, this will only work on monitors which aren’t already mounted via the VESA mount.
Tools required: Cross-head (Phillips) screwdriver
Time estimate: 10 minutes
Difficulty: Easy ●
Steps to mount with the VESA adapter:
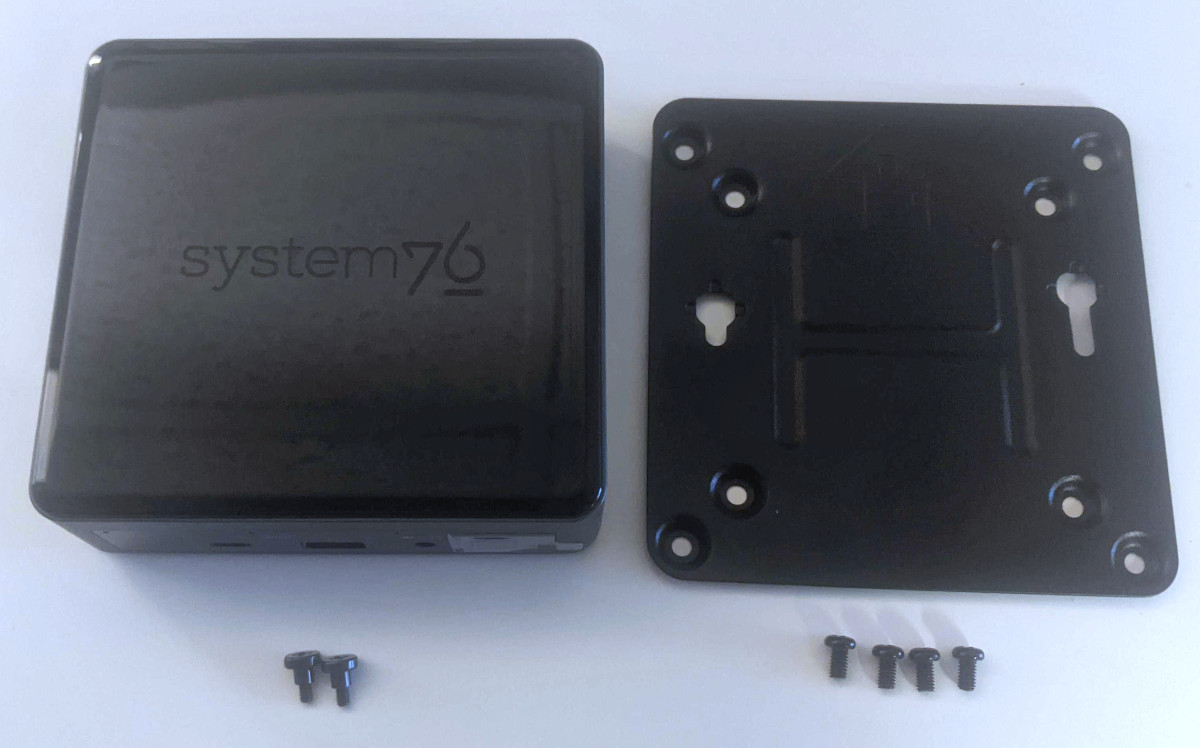
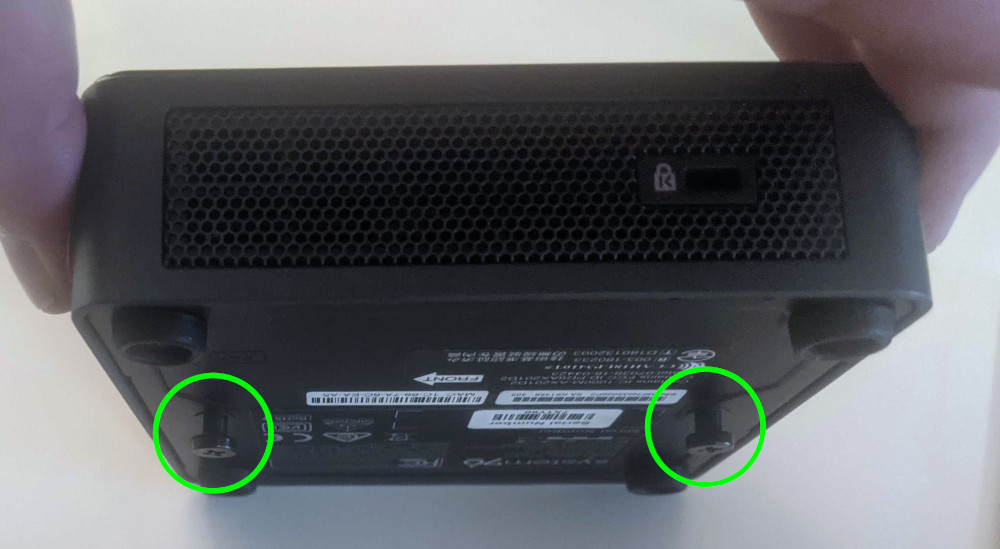
- Thread the two shoulder screws into the two screw holes in the bottom of the Meerkat.
- Mount the VESA adapter plate to the VESA mount on your monitor with the remaining four screws. The “UP” arrow indicates the orientation it should be mounted in.
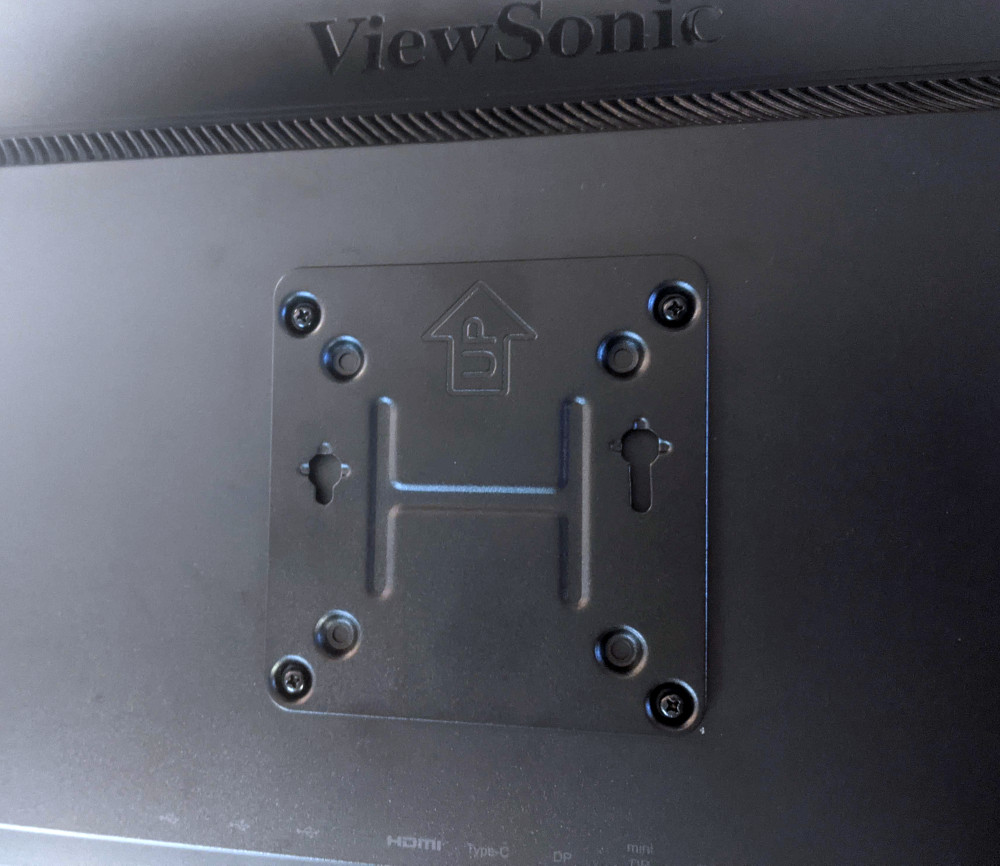
- Align the two shoulder screw studs to the cutouts in the VESA adapter. Once the studs are lined up, slide the Meerkat downwards and rotate it slightly clockwise to lock it into place.